When it comes to painting, even professionals struggle with drips, splatters and spills. Between the preparation, choosing the right paint and making sure every coat is applied evenly, there are plenty of potential obstacles.
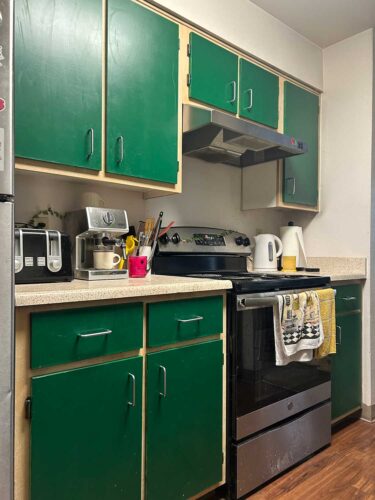
When I first moved into my apartment, I was excited to know my lease allowed me to paint the walls. While most people would unpack when they first moved in, I was sanding my kitchen cabinets, determined to execute a vision. I wanted my kitchen to feel like a forest, so I didn’t have to leave the comfort of my home to feel surrounded by green. Looking back, I’m glad I took on this project, but I wish I knew then what I know now about painting.
Preparation is key
Preparation is half the battle. Before committing to a vision, think long and hard about what the end results should look like, and remember that the first step is never cracking open the can of paint.
“Do your prep work. Prep work is the most important part if you’re going to paint your own house,” says Tyler Richman at Rodda Paint Co. in West Eugene. “If you don’t, you’ll be back here sooner rather than later.”
When preparing to paint an entire room, remove all the furniture and thoroughly clean each wall. Typically, one gallon covers 350 to 400 square feet, so measure the room before buying the supplies to estimate how much primer and paint you’ll need.
Before any primer or paint touches the walls, it’s important to spackle all of the cracks and holes, in addition to laying down drop cloths to protect the floors, Richman says.
The last step before priming is lining the trim and edges around the room with painter’s masking tape to avoid any messy lines.
Richman says, “A lot of people like to just try to skip out on the prep work. They don’t want to put primer on. They always want to put paint on. Get it done.”
He says, “I’d like to do it once and then never have to do it again.”
You shouldn’t need a primer if you are painting over a surface that is already smooth, clean and doesn’t show any signs of streaking or chipping. However, he says, if you are painting a wall that is heavily stained, textured, glossy or is a color you want to cover, then a primer can go a long way when it comes to a clean finish.
Make sure to pick a primer that’s specifically designed for the texture of the surface you are painting. Some high-quality paints will contain primer, so you don’t have to worry about the extra step.
When I was working on my cabinets, I forgot to sand the sides of the doors and didn’t think it would matter that much once I started painting. Now the original white shines through the coats of green and looks streaky like it was done with acrylic paint. Going the extra mile with preparation is the best way to ensure your results align with your original vision.
Color Swatching and Paint Brushes
Once you’re done with prep, pick up a fan deck of paint colors and find the color that calls to you. Ask yourself how the shade will affect the size and lighting of the room, and consider if it complements your furniture.
Before diving in, make sure to swatch the colors you’re debating by applying each shade you’re considering in small patches on the wall you are focusing on. This helps compare colors and check how the light affects them during different times of the day. Once you’ve officially decided on your color scheme, pick the optimal tools you need to get the job done.
Richman says flat brushes work best in larger areas, round brushes are great for details and rollers are ideal for filling large spaces. It’s important to pay close attention to the brush size, shape and bristle type as you choose between tools.
A brush is more accurate than a roller, he says, so it’s best to use them toward the corners and edges of walls for precision.
Techniques and Tips
Make sure to mix your paint with a stir stick when you first open the can and periodically while you’re painting to maintain the color’s consistency. This will help avoid clumping and streak marks when applying multiple coats.
Throughout the process, the fumes from the paint will grow stronger, so don’t forget to keep the space as ventilated as possible.
Richman says many professional painters will “cut in,” which is a painting technique that utilizes an angled brush to carefully paint around light switches and the edges of each wall to create consistent and clean lines throughout the room. It functions to create a border around each wall, so the lines are cleaner when you fill them in. From there, work from the top of the room down, filling in each wall.
“If it’s a shiny surface, get it clean, dull and dry,” he says. “These are the three biggest things you need to paint. And then after that, it’s kind of to your discretion.”